Pagina's

zaterdag 28 juni 2014

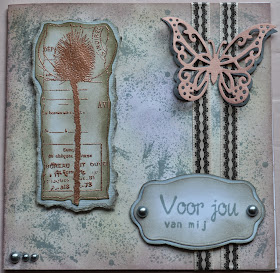
Clean and simple yet.....

Hoi allemaal,

Inmiddels zijn we terug thuis van vakantie. En m'n handen jeukten om te gaan freubelen, ik kon me niet meer inhouden. Donderdag avond om 21u waren we moe maar voldaan terug thuis. Vrijdag hebben manlief en ik hard gewerkt aan de caravan terug uitladen, poetsen, afwassen, wassen etc...
Maar op 1 dag krijg je dat natuurlijk niet allemaal opgeruimd. Maar deze ochtend kon ik me niet meer inhouden ik MOEST freubelen. Bovendien stond er bij mijn thuiskomst een doosje op me te wachten van de webshop van mijn vriendin 'Het Hobbypaviljoentje' met leuke spulletjes waaronder een gloednieuwe stempel set van Joy! crafts. Daar moest ik gewoon mee aan de slag. Maar het geweten knaagde (door het vele werk dat bleef liggen) en de inspiratie was er wel maar de uitvoering wilde maar niet lukken. Ik heb 3x opnieuw moeten beginnen omdat de inkt gevlekt had en de 3de keer heb ik op het vlekje maar een lintje gekleefd. Ben toch benieuwd wat jullie ervan vinden. In ieder geval hartelijk bedankt dat je langs kwam en dat je een berichtje achterliet.

Hi everyone,

We're back from holliday. And my hands were itching, I simply had to create something. Thursday night around 21u we got back home, tired but happy. Friday, husband and I worked hard getting the caravan back empty, cleaning up everything, I have 5 machines of washing to do (and we don't even have kids ;-) can you imagine ?) But unfortunatly you simply cannot get the job done in just 1 day, so still a lot to do today. But this morning I coudn't hold myself in control anymore had to start crafting. Besides, when I came home there was a little box waiting for me from my friends webshop www.hethobbypaviljoentje.be with lovely new stuff in it. Amongst a brand new stamp set from Joy! crafts witch I simply had to use. But the concience was killing me because of all the work that stayed undone. So the inspiration was there but the carrying out didn't work out. I had to start all over three times because I smeared my ink every time. The third time I just put a piece of ribbon and an embellishment over the smear ;-)
Still I am very curious to know what you all think of it. So thanks for stopping by and for leaving a comment behind.

pinterest


 Voor deze kaart gebruikte ik:  For this card I used:
Joy! crafts Clear Stamps stempel set Retro Cars 6410/0323
Stazon Ink Timber Brown
Distress Ink pumice stone
VersaMark Watermark stamp pad
Artemio rubber stamp ARTHK501 written letter


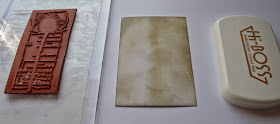
Dit zijn m'n probeersels, zoals ik al zei het idee was er maar door gebrek aan concentratie was de uitvoering ervan een beetje zoek.
These are my doodles, as I said the idea was there but the carrying out was a bit lost.


Heel erg fijn dat je weer eens langs kwam, ik waardeer een berichtje ten zeerste en wil je dan ook al bedanken daarvoor, groetjes en veel liefs.
 
So very nice you came to visit my blog, I really appreciate it when you leave a message, so I already want to thank you for that, greetings and lots of love,


Veerle xxx

dinsdag 24 juni 2014

Wild Rose Stamp

Goedemorgen allemaal op deze zonnige laatste vakantiedag in zuid Frankrijk,
Goodmorning to you all on this sunny last holiday in south of France,

Dit wordt dus mijn laatste post voor we morgenvroeg heel vroeg huiswaarts keren. Pas vrijdag zal ik dan terug op het internet kunnen, na een lange lange auto rit met caravan.
This will be my last post before we return home tomorow morning very early. It will be friday before I can go back on the internet, since it's a long drive home especially with a caravan.

Mijn kaart dus, is ook ditmaal in opdracht gemaakt voor diezelfde vrienden die naar datzelfde feestje gingen, zijnde een 15 jarig jubileum. Het moest dus een heel ander kaartje worden dan datgene van mijn vorige blog bericht. Ben benieuwd wat jullie ervan vinden.
So then, my card, is also this time made for the same friends who went to that 15th anniversary party as in my former blog post. So it had to be a totally different card. Again I am very curious what you think of it.


Gebruikte materialen voor deze kaart:
Basis in wit cardstock 15x30 cm en dubbelvouwen
Dessin papier Basis SL124 van 14,5x14,5 cm en ook Basis JBS153 en hieruit heb ik de vorm gesneden met de mal van Creative Expressions Italian Collection-Tuscany CED1505
Een cirkel uit wit cardstock gesneden met de Framelits 657551
Het plaatje is met een clear stamp van Wild Rose Studio CL367 Parisian Stroll
Ingekleurd met Faber Castell Polychromos nrs 146 sky blue - 172 earth green - 167 green olive - 225 dark red - 278 chrome oxide green - 280 burnt umber - 234 cold grey v - 124 rose carmine - 273 warm grey IV - 151 helioblue reddish - 199 black
Plaatje heb ik uitgesneden met de Framelits 657552 circles scallop van Sizzix
Andere gebruikte mallen zijn: MD creatables lr0157 Anja's decorative elements
                                                 MD creatables 0192 Anja's leaves
                                                 MD creatables lr0241 Labels Anja Van Laar
Verder nog gebruikt witte kleefparels - Distress Ink picked raspberry - witte en roze roosjes - roos veertje - heart embellishment - zilveren kleefletters - cirkel punch - clear stamp Nellie Snellen franse tekst-2  APST012 (koopel is namelijk franstalig) - Memento Inkt Tuxedo Black en Rose Bud - Viva Perlen Pen magic transparent lemon.

Materials that I've used are: Base card in white cardstock 15x30cm and fold in half
Design paper Basis SL124 of 14,5x14,5 cm
Design paper Basis JBS153 en out of this I cut a shape with the Creative Expressions Die Italian Collection-Tuscany CED1505
A white cirkel out of white linnen cardstock with the Sizzix Framelits 657551
The image is from a Wild Rose Studio clear stamp CL367 Parisian Stroll
I colored the image with the Faber Castell Polychromos pencils and all the numbers i've used are mentioned in red in the flemish explanation.
I cut out the image with the Sizzix Framelits 657552 Die Scallop Cirkels
Other dies that I used are: Marianne Design creatables lr0157 + lr 0192 + lr0241
Further I used white pearls - Distress Ink picked raspberry - white and pink roses - pink feather - heart embellishment - silver letters - cirkel punch - clear stamp Nellie Snellen APST012 French text-2 (the anniversary couple is french speaking) Memento Ink Tuxedo Black and Rose Bud- Viva Perlen Pen magic transparent lemon.

Zo dat was alles voor vandaag, ik hoop dat jullie het een mooië kaart vinden en ik kijk al heel erg uit naar jullie reacties. Dank je wel voor je bezoekje en voor het achterlaten van een berichtje.


That's it for today, I hope you like my card and I'm already looking foreward to read all your comments. Thank you so much for your visit and for posting a comment.

Hartelijke groetjes en veel liefs van,
Sincere greetings and lots of love,

Veerle xxx

zondag 22 juni 2014

Wedding anniversary card

Goedemorgen allemaal/Goodmorning to you all,

Allereerst wil ik al mijn nieuwe volgers van de laatste tijd welkom heten en bedanken voor hun lieve berichtjes. Het is super fijn om met jullie allen een uitwisseling te hebben hier in blogland. Ik hoop dat ik jullie nog meer kan inspireren net zoals jullie dat bij mij doen.

First of all I would like to welcome all my new folowers that have come along lately and to thank you all for your nice comments. It's realy so nice to have an exchange of friendship here in blogland. I hope I can continue to inspire you just as you do with me.

Mijn kaartje dat ik jullie vandaag wil laten zien heb ik in opdracht voor iemand gemaakt die naar een 15 jarig jubileum feestje ging, ben benieuwd wat jullie van het resultaat vinden.

The card I want to show you today I've made for someone, a friend of mine, who was invited to go to a wedding anniversary party. The copple was married for 15 years. I'm curious what you think of it.


Zoals ik in een paar posts geleden al zei hou ik er de laatste tijd wel van om ook de enveloppe te versieren. Bij deze heb ik dezelfde stempel gebruikt als die op de kaart.

As I already told a few posts ago, I do love to decorate the envelope too lately. With this one I used the same stamp as I used on the card.

Gebruikte materialen/Used materials :

Basiskaart in wit cardstock 15x30cm en dubbelvouwen
Daarop zwart cardstock van 14,5x14,5 cm
Daarop Silky wit cardstock van 14x14 cm dat geëmbosd is met een embossingfolder van HobbyIdee
Een restje Silky wit embossen met de Sizzix Polka Dot embos folder 3,5x14,5 cm
Kleef dit op zwart cardstock van 4x14,5 cm kleef hierover in de lengte satijn roos lint op dit lint heb ik 3 swarovski steentjes gekleefd. Aangebracht met een speciale applicator. Steentjes en applicator zijn te koop bij Het Hobbypaviljoentje en de steentjes zijn er in diverse kleuren.
Vervolgens een stuk silky wit cardstock van 8,5x8,5 cm embossen met de polka dot embos folder van Sizzix en kleef ook dit weer op zwart cardstock van 9x9 cm
Stans uit silky wit 2 harten met de MD creatables LR0280 Petra's Heart mal
Stempel hierop met Top Boss embossing inkt (die is wat vettiger) een hart met de Viva My Paper world  4003 020 00 clear stamp "LOVE"
Bestrooi de twee gestempelde harten met Papermania embossing poeder Tinsel Silver en bewerk met de heat gun. Ik heb hetzelfde gedaan met de cijfertjes 15 en met de tekst sentiment.
Het label is gemaakt met de MD creatables LR0241 Labels Anja Van Laar
Tot slot nog 3 roze roosjes en roos satijnen lint voor het strikje en zilveren stickers.

I started for the base with white cardstock 15x30 cm and fold in half.
On top of that I put black cardstock of 14,5x14,5 cm
Then I embossed a piece of silky white of 14x14 and used an embossing folder from HobbyIdee
A little piece of silky white 3,5x14,5 I embossed with the Sizzix polka dot folder
I then glued this little piece on black cardstock of 4x14,5 cm
On this piece I attached my pink satin ribbon on which I put 3 Swarovski stones for this I used a special applicator and it's especially for the cardmaking the stones are available in different colors.
I like it a lot and you can buy the applicator and the stones in my friends webshop Het Hobbypaviljoentje.
Then I embossed a piece of silky white with the Sizzix polka dot folder and glued this on black cardstock of 9x9 cm
Make 2 hearts out of silky white with the Marianne Design Die creatables lr 0280 Petra's Heart
On these two hearts I stamped with embossing ink from Top-Boss (this one's a bit more greasy)
a heart with the Viva My Paper World clear stamp 4003 020 00 "LOVE"
I used the Papermania embossing powder Tinsel Silver and heat set it with the Heat Tool
I did the same with the 15 and the sentiment.
The label I made with the Marianne Design Die creatable lr 0241 Anja Van Laar Labels
And to finish it I used 3 little pink roses and some satin pink ribbon to make the bow.

Ik ben weer heel erg benieuwd naar jullie reacties, alvast bedankt voor het langskomen en om een berichtje achter te laten. Ik wens jullie nog een hele fijne en zonnige zondag, veel liefs van ,

I am very curious to read all your reactions and I want to thank you for stopping by and for taking the time to leave a comment behind. I wish all of you a nice and sunny sunday, lots of love,

 
Veerle  xxx


woensdag 18 juni 2014

Old Oak Tree Variation

Hallo, Hallo iedereen,
Hi everyone,

Vandaag is het een regenachtig dagje hier in zuid Frankrijk, ideaal om een beetje te bloggen dus.
Ik wil jullie vandaag graag een variatie tonen op mijn grote oude eiken boom van de vorige post.
Het is een min of meer zelfde werkwijze met Distress Ink, embossing poeder maar toch een heel
ander uitzicht geworden. Ik wilde graag de illusie hebben dat je door het raam naar buiten kijkt.

Today we have a bit of a rainy day here in south France, ideal to blog and to put a new post on my blog. In my post for today I want to show you a variation on my big old oak tree of last time. It's more or less the same technique as the previous card with Distress Ink and embossing powder but still a totally different card. (at least I think it is ;-) I wanted to have the illusion as if your are looking through a window.

maandag 16 juni 2014

Old Oak Tree in Blue

Hallo allemaal/Hi everyone,

Eerst wil ik jullie vertellen dat we hier op vakantie in Zuid-Frankrijk al heerlijk weer hebben gehad en er al goed van geprofiteerd hebben. Ik hoop dat ook met jullie alles goed is.

First of all I would like to tell you all that we've had a wonderful and very sunny holiday here in South of France so far. I hope you're all doing well.

Hopelijk vinden jullie de kaart mooi, alvast bedankt voor je bezoekje en voor het achterlaten van een berichtje.

I hope you like my card and I already want to thank you for your visit and for leaving a comment.


Vandaag heb ik een kaart gemaakt met een stempel van Sheena Douglass 'A Little Bit Sketchy-The Majestic Oak'
Verder heb ik de achtergrond gekleurd met Distress Ink weathered wood, broken china, faded jeans en chipped sapphire.
Daarna heb ik de boom gestempeld met embossing inkt en bewerkt met Papermania embossing poeder Black.
Het koordje heb ik bij de action gekocht.

For my card today I used a stamp from Sheena Douglass which is called 'A little bit sketchy-The majestic Oak'.
For the background I used Distress Inks weathered wood, broken china, faded jeans and chipped sapphire.
The Oak tree I stamped with Hi-Boss embossing ink and then used Papermania embossing powder Black. Made a few turns around the card with bakers twine and that's it.

Ik ben weer heel benieuwd wat jullie ervan vinden en wil jullie graag bedanken voor het achterlaten van een berichtje.

I am very curious what you think of this card and I already want to thank you for leaving a comment here.

Heel veel liefs van mij voor jullie allen en tot de volgende blog,

Lots of Love for you all and till the next blog,

Veerle x x x


woensdag 11 juni 2014

Foto Tutorial


Hoi iedereen, Hi everyone,

Ik had al verteld dat ik een foto tutorial ging maken. Ik had hem al gemaakt maar nog geen tijd gehad om hem te posten, wel hier is ie dan. Ik hoop dat jullie het mooi en leuk vinden en ik ben weer heel erg benieuwd naar jullie reacties.

I already told that I was going to make a foto tutorial. It was ready for some time, however I had not found the time yet to post it on my blog. Well here it is ! I am very curious for your reactions, I hope you like it.

Hieronder zie je de kaart die ik jullie in deze foto tutorial wil tonen. Op het einde toon ik jullie ook nog 3 variaties op deze kaart.

This is the card I want to show you today in this foto tutorial. At the end I will also show you 3 variations on this card.


Op de eerste foto zie je alles wat we nodig hebben/On this first picture you see all the materials we will going to need.
Wit cardstock/White cardstock 14x28 cm dubbelvouwen/fold in half
Het rest strookje dat je hiervan over hebt gebruik je voor je stempel en je label/The piece you have left over from cutting your base card you can use to stamp your image on and for your label.
 
 Beinkt het rest strookje cardstock met Distress Ink pumice stone en frayed burlap
Ink up the piece left over cardstock with Distress Ink pumice stone & frayed burlap
 
 
Beinkt je stempel met embossing inkt, ik heb de stempel gebruikt van Crafty Individuals en Hi-Boss embossing inkt.
Ink up your stamp with Hi-Boss embossing ink, the stamp I used is from Crafty Individuals
 
Bestrooi je gestempelde image rijkelijk met Papermania embossing poeder copper
Sprinkle richly Papermania embossing powder copper onto your project


Klop het overtollige embossing poeder eraf, dat kan terug in het potje
Remove the access of powder and put it back in the jar
 
Verwarm met de heat tool zodat het embossing poeder smelt. Trucje:ik duw de zijkant altijd naar beneden met een penseel of stokje of iets dergelijks zo krult je werkje niet op en heb je minder moeite nadien om het plat te krijgen of op te kleven.
Heatset your project with the heat gun so that your embossing powder melts. Tric: I always use a little stick or pencil or so to puch down the edge of my project so that it doesn't curl that much. Makes it easier afterwards to glue it on your card.


Dit is het resultaat
Here you see the result
Hier heb ik het een beetje schuin gehouden, hopelijk kun je het effect van het koper hier beter zien
I hope on this picture you can see the effect of the copper a bit better.
Laat je afdrukje goed drogen en bewerk nu je basis kaart met Distress Ink antique linen en voeg daarna nog milled lavender toe.
Leave your heatset project aside to dry and cool down. Ink up your base card with Distress Ink antique linen and after wards add some milled lavender
 
Bewerk de randen met Distress victorian velvet voor een diepte effect
Ink up the edges with Distress victorian velvet for an effect of depth


Met de Grunge stempel set van Joy crafts en Memento Ink London Fog breng je op de volledige kaart een grunge effect aan.
With the Joy! crafts Grung stamp set and Memento Ink London Fog apply a grunge effect over the entire card.
Dit is het resultaat/Here you see the result
 
 
Vervolgens knip je het geemboste afdrukje uit
Then you cut out your embossed image
Kleef het op grijs cardstock, scheur het met de losse hand uit en bewerk de gescheurde rand met de Memento Ink London Fog.
Glue your image onto grey cardstock, tear it out and ink up the torn edges with Memento Ink London Fog.
Snijd uit roos en grijs cardstock de vlinders uit met de stencil van Joy! crafts Vintage Flourishes 6003/0023 Vlinders
With the Joy! crafts stencil Vintage Flourishes 6003/0023 Butterflies I cut out the butterflies in pink and grey cardstock.

 
Stans de label uit wit en grijs cardstock en beinkt het witte label ook met de london fog. Gebruikte mal Docrafts x-cut XCU 503066 Tags tekst met de clear stamp van Joy! crafts 6410/0010
Cut out the label one time in white cardstock and one time in grey cardstock. Ink up the white one with the london fog the text sentiment is Joy! crafts 6410/0010 the label die is Docrafts x-cut xcu503066 Tags
Kleef het image en het label op de kaart met 2mm dikke foam tape. Kleef er ook nog lint op van Docrafts PMA367113 Papermania Capsule collection Midnight Blush, kleef de vlinders erop en enkele grijze kleefparels.
Glue the image and the label on the card using 2mm thick foam tape. Also glue some ribbon onto the card, I used Docrafts PMA367113 Papermania Capsule collection ribbon Midnight blush. Put the butterflies on the card and some grey pearls.
 
En dit is dan de afgewerkte kaart. And here is the finished card.
Ook de binnenzijde van de kaart werd versierd/Also the inside of the card has been inked up
En iets wat ik de laatste tijd wel vaker doe, de omslag versieren
Something I do regular lately, inking up the envelope
En hier is een variant op de kaart het label is rond en ik heb als extra een takje erbij gedaan met de mal Joy! crafts Vintage Flourishes - Bille's Flourish 6002/0263
This is a variation on the original card the sentiment is round and I have put an extra with the Die from Joy! crafts Bille's Flourish 6002/0263
Voor wie misschien niet de Crafty Individuals stempel heeft heb ik dit alternatief gemaakt met de Joy! crafts clear stamp 6410/0015 Bloem/Bladeren nr2 en nog een andere tekst stempel.
For those who don't have the Crafty Individuals stamp I made this card with the Joy! crafts clear stamp 6410/0015 Flower nr 2


En ook als condoleance kaart kan dit dienen maar dan met aangepaste kleuren hiervoor heb ik gebruikt Distress Ink weathered wood - pumice stone en black soot, het embossing poeder is Papermania zwart en de teksten zijn gestempeld met Memento Tuxedo Black.
Also as a condolence card you can make this card. With other colors, for this card I used Distress Ink weathered wood and pumice stone and some black soot, the embossing powder is Papermania Black, and the text sentiment I stamped with Memento Tuxedo Black
 
Dat is de hele tutorial met alternatieven. Een hele boterham maar iemand had mij gevraagd om zo eens iets stapje voor stapje te tonen omdat ze het soms moeilijk vind om vanaf niets een kaart op te bouwen. Ik hoop dat jullie de kaarten mooi vinden en ik kijk weer uit naar jullie berichtjes.
 
That's the whole tutorial with the alternatives too. It's a lot I know but someone had asked me to show step by step how to build up a card since she finds it rather difficult. I do hope you like the cards and I am looking foreward to read your comments.
 
van Veerle, Hugs and greetings from Veerle
 

vrijdag 6 juni 2014

Boek Kaart/Book Card

Hallo allemaal, Hi everyone,

Vanuit het zonnige Zuid-Frankrijk groet ik jullie met deze nieuwe post.
Natuurlijk heb ik hier niet lekker zitten freubelen, ik heb er nog een paar in de wachtrij staan die ik thuis nog gemaakt had.

I greet all of you from the sunny south of France with this new post.
Ofcourse I haven't been crafting here, I still have a few cards queing up, that I made at home.

Vandaag wil ik jullie nog eens een boekkaart tonen, deze heb ik gemaakt voor mijn lerares Frans.
Ik hoop dat jullie hem mooi vinden. In ieder geval wil ik iedereen bedanken voor zijn bezoekje en voor het achterlaten van je berichtje, dat is altijd super leuk.

Today I want to show you another book card that I made for my French teacher. I hope you'll like it.
I also want to thank all of you for your visit and for leaving a comment, which is always nice to read.

 
Dit is de voorkant van het boekje/This is the front of the book card.
 
 
Op deze foto zie je goed dat de kaart echt de dikte van een boekje heeft.
On this picture you can see very well that the card has the thickness of a book.
 
 
En hier is dan de binnenzijde. Die had ik opgevuld met "Merci" chocolaadjes, heel toepasselijke naam om aan de lerares frans te geven nietwaar ?
And this is the inside of the book-card. I had filled this with chocolates that are called "Merci" the french word for thank you and I think these chocolates have an appropriate name to give to a french teacher, is it not ?
 
 
En tot slot is dit nog de achterzijde.
And finally this is the back side.
 
Gebruikte materialen/used materials:
 
Je hebt nodig 5 stukken ecru cardstock: 1x  15x29,4 cm ril op 13,7 en op 15,7 cm
                                                                2x  12,5x24 cm ril op elke 2 cm
                                                                2x   14,5 x 24 cm ril op elke 2 cm
 
You will need 5 pieces of ecru cardstock:  1x  15x29,4 cm fold at 13,7 and 15,7 cm
                                                                   2x   12,5 x 24 cm fold at every 2 cm
                                                                   2x   14,5 x 24 cm and fold at every 2 cm
 
Randpons van Martha Stewart / Edge punch from Martha Stewart
Distress Ink : victorian velvet & vintage photo
Stazon Ink : Timber Brown
 
Clear stamps: Marianne Design CS0855 Anja Van Laar "teksten" / "sentiments"
                       Viva My Paper World 4003 066 00 "Invitation" french sentiments
                       Viva My Paper World 4003 065 00 "Merci" french sentiments
                       Hobby Idee hi-stamp-0022 Vintage Butterfly
 
Design Paper Docrafts Papermania PMA160225 Capsule Collection-Midnight Blush
 
Mal/Die : Joy! crafts Noor-Design Oval 6002/0304
 
Ponsen/Punches : Nellie Snellen FLP031 Rose Leaf
                             Nellie Snellen FLP002 Flower-1 Medium
 
Verder nog/and further also: roosjes-kleefparels-meeldraadjes-satijnen lint voor de strik
                                               small paper roses-pearls-satin ribbon for the bow
 
Plaatje/Image: Marianne Design-Victorian Vintage VK9528
 
Dat was het weer voor vandaag, ik ben weer heel benieuwd om te lezen wat jullie ervan vinden.
Alvast hartelijk bedankt dat je bent langs gekomen en dat je een berichtje hebt achtergelaten.
 
That's it for today, again I am very curious to read if you liked my book-card.
Thank you so much for visiting and for leaving a comment.
 
Hartelijke groetjes en tot gauw,
Loving greetings and untill soon,


maandag 2 juni 2014

Vintage


Hallo allemaal, Hi everyone,

Dit wordt mijn laatste post voor ik op vakantie vertrek (dinsdag na mijn examen zijn we weg) maar we hebben internet op de camping en ik heb nog enkele kaarten op mijn laptop staan dus ik ga ook op vakantie nog kaartjes posten.

This will be my last card before I leave for holliday (thuesday after my exame french we go) but, we have wifi on the camping and I have some cards on my laptop, so I will put posts on my blog.

Ditmaal heb ik nog eens een vintage kaartje gemaakt. Op vraag van mijn schoonmama die dit kaartje voor iemand wilde hebben en zij houd zelf heel erg van vintage, vandaar.

This time I again made a vintage card since I made it for my mother in law. She wanted a card for someone and she herself loves vintage, therefore.


Gebruikte materialen:
Basiskaart in licht grijs linnen karton 14x28 cm en dubbelvouwen
verder van hetzelfde ook nog 9x12 cm en 6,5x7,5 cm
Dessinpapier Rayher blauw-wit Polka Dot van 13,5x13,5 cm
Dessinpapier Janneke Brinkman JBS152 van 8,5x11,5 cm
Plaatje Marianne Design knipvel VK9528
Wit veertje-blauw roosje-kleefparels-wit satijnen lint-Perlen Pen Pastel Geel
Nellie Snellen clear stamp: LILA005
Distress Ink: broken china, weathered wood
Stazon Ink: ultramarine
Ponsen: FLP003 Flower 1 jumbo + FLP002 Flower 1 medium + FLP020 Flower 1 small
Mallen: Nellie Snellen MFD070 Wavy Oval en MFD047 Oval-4
              Marianne Design LR0157 Anja's Decorative Elements

Materials that I used:
Basis for the card light grey linnen 14x28 cm and fold in half
of the same also a piece of 9x12 cm and 6,5x7,5 cm
Design paper Rayher blue-white Polka Dot 13,5x13,5 cm
Design paper Janneke Brinkman JBS152 of 8,5x11,5 cm
Image Marianne Design VK9528
White feather - little blue rose - pearls - white satin ribbon - Perlen Pen Pastel yellow
Clear stamp for the sentiment Nellie Snellen LILA005
Distress Ink: broken china & weathered wood
Punches: Nellie Snellen FLP003 Flower 1 Jumbo + FLP002 medium + FLP020 small

Dat was het weer voor vandaag. De volgende keer dat we elkaar hier treffen ben ik in Zuid Frankrijk aan het genieten van het zonnetje. Dank je wel voor je bezoekje en voor je berichtje.

That's it for today. The next time we see each other here hopefully I will be enjoying the sunshine in South of France. Thank you for your visit and for your comment. Have a nice day, hugs and greetings from Veerle.