
Ik had al verteld dat ik een foto tutorial ging maken. Ik had hem al gemaakt maar nog geen tijd gehad om hem te posten, wel hier is ie dan. Ik hoop dat jullie het mooi en leuk vinden en ik ben weer heel erg benieuwd naar jullie reacties.
I already told that I was going to make a foto tutorial. It was ready for some time, however I had not found the time yet to post it on my blog. Well here it is ! I am very curious for your reactions, I hope you like it.
Hieronder zie je de kaart die ik jullie in deze foto tutorial wil tonen. Op het einde toon ik jullie ook nog 3 variaties op deze kaart.
This is the card I want to show you today in this foto tutorial. At the end I will also show you 3 variations on this card.


Op de eerste foto zie je alles wat we nodig hebben/On this first picture you see all the materials we will going to need.
Wit cardstock/White cardstock 14x28 cm dubbelvouwen/fold in half
Het rest strookje dat je hiervan over hebt gebruik je voor je stempel en je label/The piece you have left over from cutting your base card you can use to stamp your image on and for your label.

Beinkt het rest strookje cardstock met Distress Ink pumice stone en frayed burlap
Ink up the piece left over cardstock with Distress Ink pumice stone & frayed burlap
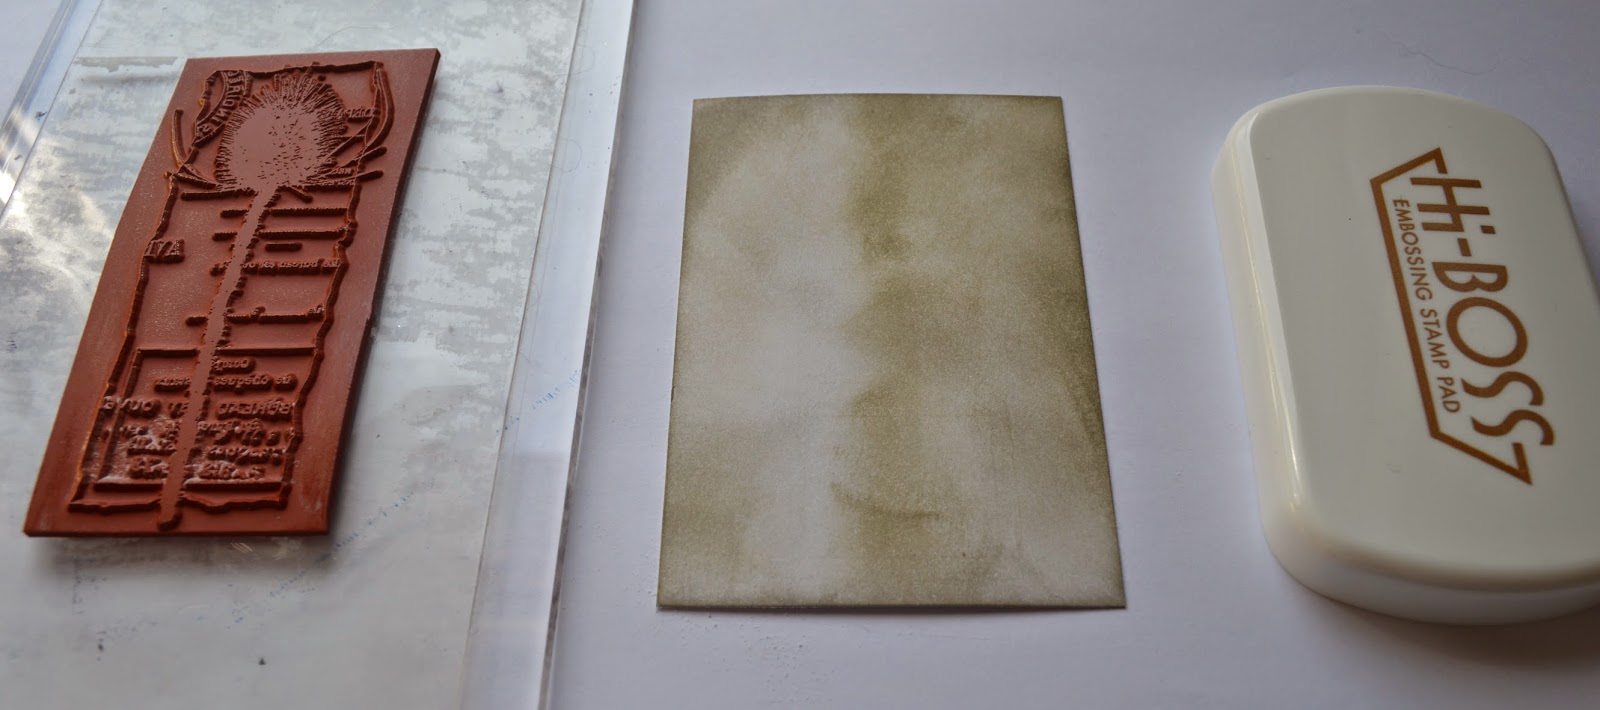
Beinkt je stempel met embossing inkt, ik heb de stempel gebruikt van Crafty Individuals en Hi-Boss embossing inkt.
Ink up your stamp with Hi-Boss embossing ink, the stamp I used is from Crafty Individuals

Bestrooi je gestempelde image rijkelijk met Papermania embossing poeder copper
Sprinkle richly Papermania embossing powder copper onto your project

Klop het overtollige embossing poeder eraf, dat kan terug in het potje
Remove the access of powder and put it back in the jar

Verwarm met de heat tool zodat het embossing poeder smelt. Trucje:ik duw de zijkant altijd naar beneden met een penseel of stokje of iets dergelijks zo krult je werkje niet op en heb je minder moeite nadien om het plat te krijgen of op te kleven.
Heatset your project with the heat gun so that your embossing powder melts. Tric: I always use a little stick or pencil or so to puch down the edge of my project so that it doesn't curl that much. Makes it easier afterwards to glue it on your card.

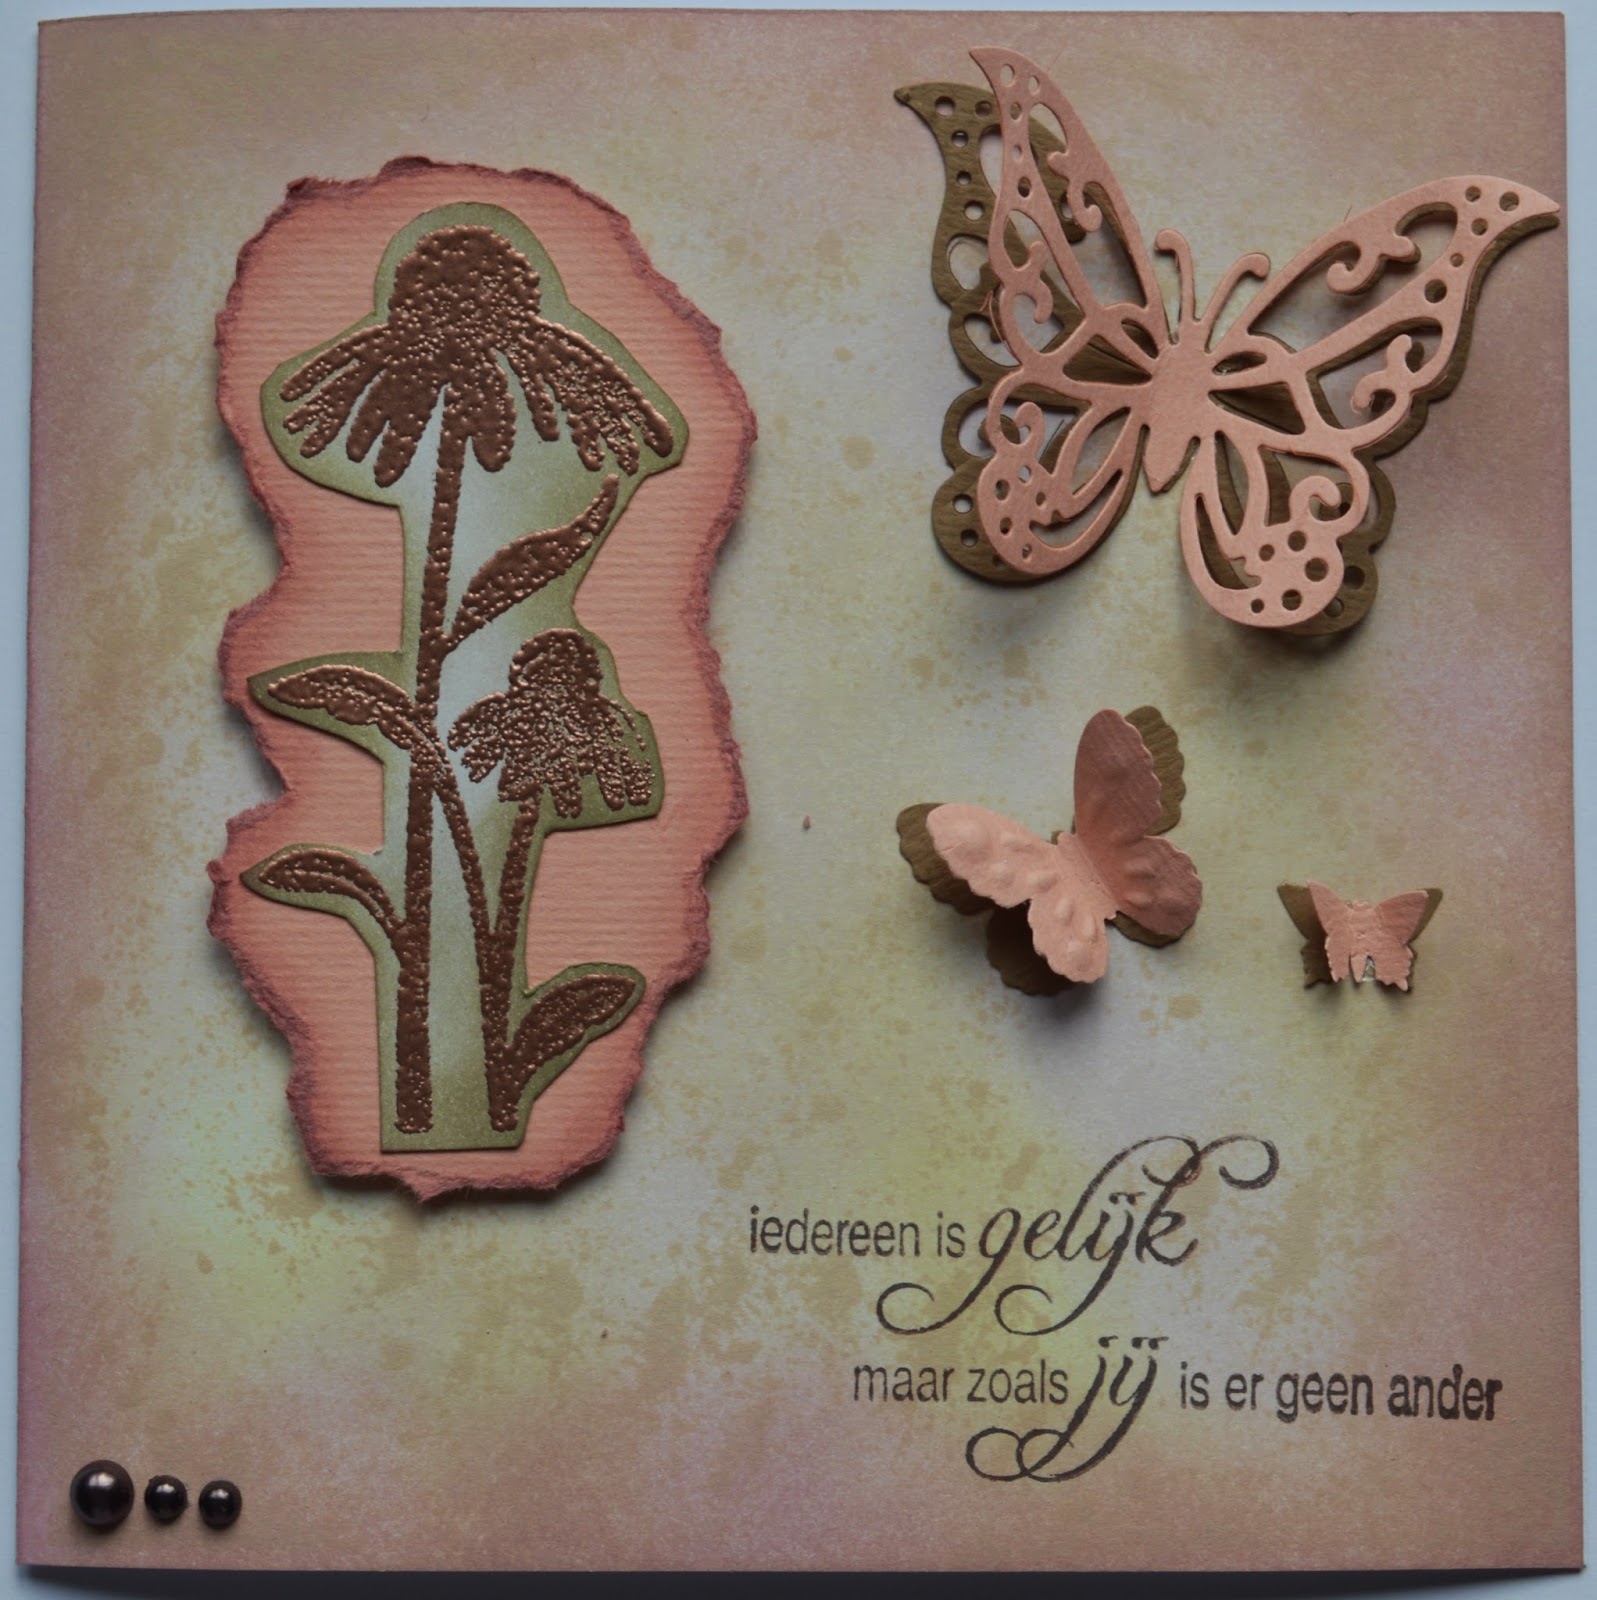
Dit is het resultaat
Here you see the result

Hier heb ik het een beetje schuin gehouden, hopelijk kun je het effect van het koper hier beter zien
I hope on this picture you can see the effect of the copper a bit better.

Laat je afdrukje goed drogen en bewerk nu je basis kaart met Distress Ink antique linen en voeg daarna nog milled lavender toe.
Leave your heatset project aside to dry and cool down. Ink up your base card with Distress Ink antique linen and after wards add some milled lavender

Bewerk de randen met Distress victorian velvet voor een diepte effect
Ink up the edges with Distress victorian velvet for an effect of depth

Met de Grunge stempel set van Joy crafts en Memento Ink London Fog breng je op de volledige kaart een grunge effect aan.
With the Joy! crafts Grung stamp set and Memento Ink London Fog apply a grunge effect over the entire card.

Dit is het resultaat/Here you see the result

Vervolgens knip je het geemboste afdrukje uit
Then you cut out your embossed image

Kleef het op grijs cardstock, scheur het met de losse hand uit en bewerk de gescheurde rand met de Memento Ink London Fog.
Glue your image onto grey cardstock, tear it out and ink up the torn edges with Memento Ink London Fog.

Snijd uit roos en grijs cardstock de vlinders uit met de stencil van Joy! crafts Vintage Flourishes 6003/0023 Vlinders
With the Joy! crafts stencil Vintage Flourishes 6003/0023 Butterflies I cut out the butterflies in pink and grey cardstock.

Stans de label uit wit en grijs cardstock en beinkt het witte label ook met de london fog. Gebruikte mal Docrafts x-cut XCU 503066 Tags tekst met de clear stamp van Joy! crafts 6410/0010
Cut out the label one time in white cardstock and one time in grey cardstock. Ink up the white one with the london fog the text sentiment is Joy! crafts 6410/0010 the label die is Docrafts x-cut xcu503066 Tags

Kleef het image en het label op de kaart met 2mm dikke foam tape. Kleef er ook nog lint op van Docrafts PMA367113 Papermania Capsule collection Midnight Blush, kleef de vlinders erop en enkele grijze kleefparels.
Glue the image and the label on the card using 2mm thick foam tape. Also glue some ribbon onto the card, I used Docrafts PMA367113 Papermania Capsule collection ribbon Midnight blush. Put the butterflies on the card and some grey pearls.

En dit is dan de afgewerkte kaart. And here is the finished card.

Ook de binnenzijde van de kaart werd versierd/Also the inside of the card has been inked up

En iets wat ik de laatste tijd wel vaker doe, de omslag versieren
Something I do regular lately, inking up the envelope

En hier is een variant op de kaart het label is rond en ik heb als extra een takje erbij gedaan met de mal Joy! crafts Vintage Flourishes - Bille's Flourish 6002/0263
This is a variation on the original card the sentiment is round and I have put an extra with the Die from Joy! crafts Bille's Flourish 6002/0263
Voor wie misschien niet de Crafty Individuals stempel heeft heb ik dit alternatief gemaakt met de Joy! crafts clear stamp 6410/0015 Bloem/Bladeren nr2 en nog een andere tekst stempel.
For those who don't have the Crafty Individuals stamp I made this card with the Joy! crafts clear stamp 6410/0015 Flower nr 2

En ook als condoleance kaart kan dit dienen maar dan met aangepaste kleuren hiervoor heb ik gebruikt Distress Ink weathered wood - pumice stone en black soot, het embossing poeder is Papermania zwart en de teksten zijn gestempeld met Memento Tuxedo Black.
Also as a condolence card you can make this card. With other colors, for this card I used Distress Ink weathered wood and pumice stone and some black soot, the embossing powder is Papermania Black, and the text sentiment I stamped with Memento Tuxedo Black
Dat is de hele tutorial met alternatieven. Een hele boterham maar iemand had mij gevraagd om zo eens iets stapje voor stapje te tonen omdat ze het soms moeilijk vind om vanaf niets een kaart op te bouwen. Ik hoop dat jullie de kaarten mooi vinden en ik kijk weer uit naar jullie berichtjes.
That's the whole tutorial with the alternatives too. It's a lot I know but someone had asked me to show step by step how to build up a card since she finds it rather difficult. I do hope you like the cards and I am looking foreward to read your comments.
 van Veerle, Hugs and greetings from Veerle
13 opmerkingen:
This is just gorgeous,lovely image and details.xxx
Hi Veerle, this is one excellent tutorial and what a gorgeous finished project superb work, I love it.
hugs
lorraine x
Wat een werk, een bijzonder resultaat!!!
Creatieve groetjes, Gaby
hoi Veerle,
heel duidelijk met al die foto's, zeker geslaagd
en ook het resultaat is heel erg mooi
nog fijne zonnige dagen
xxx leentje
Hey Veerle
Veel werk, maar het resultaat mag er zijn,maar dat wist ik al he,
Puf nog maar een beetje daar en vooral geniet ,want het is zo voorbij.
xxx Maria
Hallo Veerle,
wat een mooie kaart
en bedankt zeg om dit alles met ons te delen wat een werk
heel knap werk !!
lieve groetjes martine
Ha Veerle,
Wat een prachtige kaart heb je gemaakt, leuk om te lezen hoe je het allemaal doet.
Knap van je hoor.
Liefs van Hetty
Hoi Veerle,
Wat een heerlijke duidelijke foto's, er gaat een wereld voor mij open , en het is een fantastische kaart geworden, dikke pluim, Liefs Lisa
Wonderful tutorial and design.
Hugs Diane
Three fantastic cards and it's great to see how you made them. Jenny x
Thankyou for popping in at my blog Veerle and your lovely comment..it is so nice to meet you and great to find someone else who loves their Faber Castell pencils.I have never used any other pencils and hopeless with copics unless it is a small space to colour.
Love your three fabulous cards and such a great tutorial.
luv CHRISSYxx
Gorgeous card and fantastic tutorial, I haven't done embossing in ages you have inspired me to get it out.
Chris x
Hallo Veerle,
Prachtig je uitleg en heel duidelijk en ook weer schitterende kaarten, zou wat meer tijd moeten hebben omdat ook allemaal eens uit te proberen. Geniet van alles en liefs van Lydia
Een reactie posten