
Hi everyone,
Hallootjes iedereen,
Some of you were curious to know what I have been up to in my tiny craft corner.
So as promised here are pictures and some explanation of my brand new craft
corner I am very pleased with it because it works so much better. If there is one
thing I really hate it is searching for things, it's a total waste of precious time. So I
have a little system for about, ... EVERYTHING ! LOL LOL LOL
Sommigen van jullie wilden heel graag weten en zien wat ik allemaal heb uitgespookt in
mijn kleine knutsel hoekje. Daarom zoals beloofd zijn hier de foto's en wat uitleg erbij.
Ik ben mega, super blij met mijn nieuwe hoekje want dat werkt zoveel fijner. Als er
één iets is waar ik echt een hekel aan heb dan is dat wel moeten zoeken naar
spulletjes. Dat is zo'n verspilling van kostbare tijd. Dus heb ik systeempjes
voor zowat ... ALLES !! LOL LOL

Het plafond is in aanleg

Behangpapier op de muur, knutseltafel geschilderd, schap geschilderd, raamkozijn en houten muur geschilderd.

stuff on it. It took a while though before everything was
where I wanted it. (It's all good by now)
Twee gloednieuwe grote rekken om al mijn spulletjes op te
bergen. Het duurde wel even voor alles stond waar ik het
echt hebben wilde en wat het handigste was. (Nu is het
ondertussen allemaal op zijn plaats)

my little plastic pots fit right in, that contain my paper flowers
(the ones I don't make myself) and my feathers etc etc
Dit is een klein houten rekje dat mijn vadertje voor mij gemaakt
heeft. Daar passen al mijn plastic potjes netjes en precies in.
In die potjes bewaar ik mijn papieren bloemetjes (degenen die
ik niet zelf maak) en mijn veertjes etc etc

My dad also made this rack in wood and it is made to fit perfect under the shelf you see on the second picture above. And it contains all my Distress Inks and Stazon, Archival etc
Mijn vader heeft ook dit houten rek gemaakt en het past perfect onder het schap dat je ziet
op de tweede foto hierboven. Hierin past al mijn Distress Ink, Stazon, Archival, etc

Here a close up of my ink rack. As you can see I've put a label on the front with the
name and a number. The numbers are just random in order of purchase.
Number 1 for example is vintage photo, that was my very first distress ink.
Hier is een close up. Zoals je ziet heb ik op elke voorzijde een label gedaan met
de naam van de kleur en ook een nummer. De nummering is random, gewoon volgens
aankoop. Nummer 1 is bijv. vintage photo, die kleur heb ik het eerst gekocht.

I made colour charts and above
the colour is the name and the
number that's on the box. So
when I use ink (and I use ink on
almost every singel card) I take my colour charts choose my
colours and by number I take them out of
my rack.
No more searching. Before I had them stored in a big plastic container so I had to
take a lot of inks out before I had the correct colour.
En hier is mijn Distress Ink systeem. Ik heb voor elke groep, kleuren kaarten gemaakt.
Boven de kleur staat de naam en de nummer die ik eraan gegeven heb. Wanneer ik
nu inkt nodig heb (en ik gebruik op zogoed als elke kaart inkt) kijk ik op mijn kleuren
kaarten en ik neem de corresponderende nummers direct uit mijn rekje. Niet meer zoeken dus. Voorheen had ik ze allemaal in een grote plastic bak zitten en dat was graven en zoeken naar de juiste kleur.


And here's another great thing. Very recent I discovered working with the mini
blending tool and now I love using it. But I also like to keep my sponges with its
rightful colour. So, here's what I did. I bought strips of round velcro (sorry don't know
the name in english) It has a self adhesive back so I stick it on the bottom of the ink
box, and the sponges have velcro on their back too so the sponges stick to the
bottom of the ink box. This way I can keep every sponge with its colour and I
have them immediately at hand.
En hier is nog een geweldig leuks iets. Heel recent heb ik het werken met de mini
blending tool ontdekt en ik werk daar nu super graag mee. Maar ik hou ook graag de
sponsjes bij de juiste kleur. Dus, dit is wat ik gedaan heb. Ik heb strippen gekocht
ronde velcro rondjes. De achterkanten zijn zelfklevend dus ik kleef zo'n rondje op de
onderkant van mijn doosje en de sponsjes hebben ook een velcro achterkant en zo
kan ik dus de sponsjes aan de onderkant van de inkt doosjes kleven. De sponsjes
blijven zo bij de juiste kleur en ik moet niet naar de sponsjes zoeken, ik heb ze
direct bij de hand.


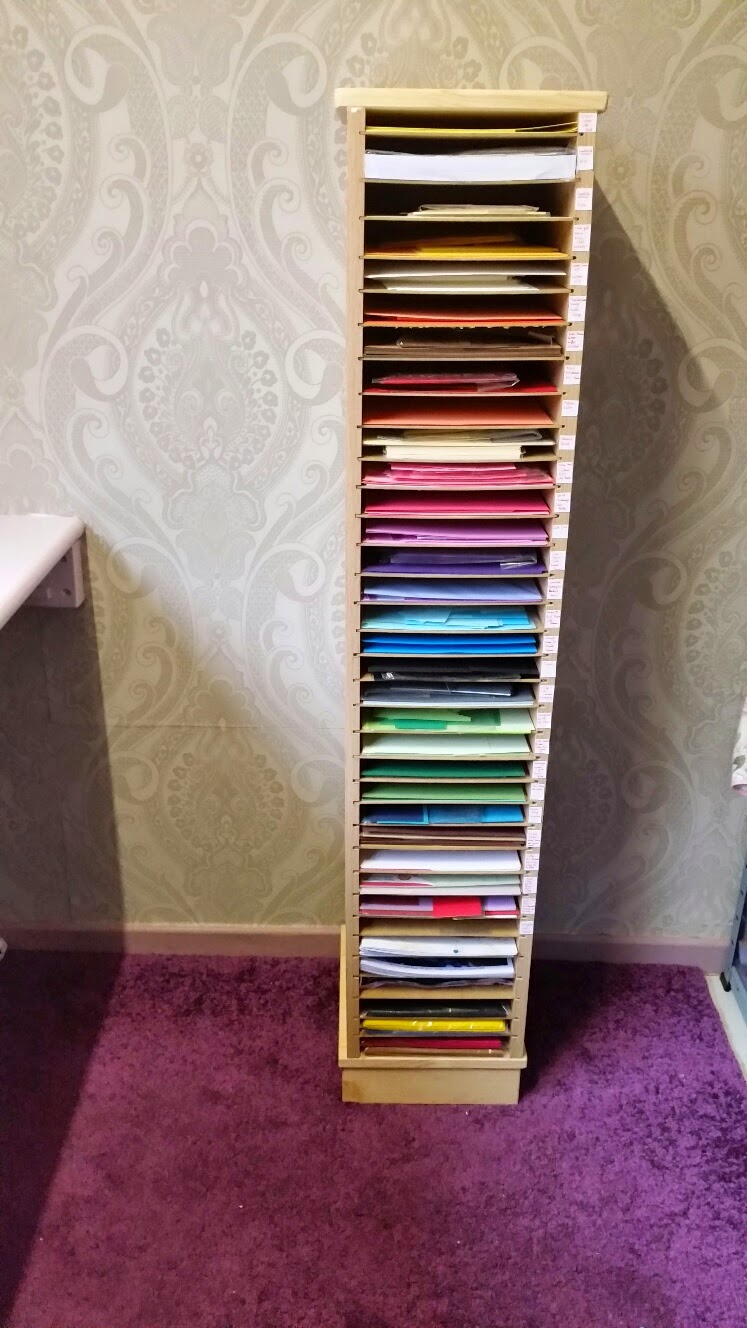
(made by dad)
And it's my paper tower, by colour. So easy. Before it was
also in a big plastic container and I broke my back every
time I needed to get out some paper.
Dit rek heeft wieltjes en is dus makkelijk verplaatsbaar.
(natuurlijk ook weer gemaakt door papa) Het is mijn
papier toren, per kleur. Zo gemakkelijk. Voorheen had ik dit
allemaal in een grote open plastic bak zitten die op mijn
onderste schap stond maar ik brak mijn rug telkens ik
die bak eruit trok om papier te nemen.

desk. And it's filled with my little plastic containers.
Hier is mijn houten rekje dat je op één van de vorige foto's
al zag maar nu staat het op zijn plaats en is het gevuld
met al mijn kleine plastic potjes.

Nog een close up. Bovenin mijn potjes Perfect Pearls
poedertjes.

Nog een close up, hier van de bloemetjes potjes.

An overall view.
Een algemeen overzicht.

En hier is mijn tweede en derde rek ook op z'n plaats.


In this one I keep my paint dabbers, Dylusions, etc etc
In dit rek bewaar ik mijn verf dabbers, dylusions inkt
sprays etc etc

ring binder with a print of all my
stamps by brand. Under the
image I have written the name
of the stamp and where I can find it.
Nog een ander systeem. Ik heb
een ringmap gemaakt met een afdrukje in van elke stempel per
merk. Onder de afbeelding staat de naam van de stempel en waar ik hem kan vinden.

a print of the vintage flourish, under the name I wrote
IN BOX 1 So this particular stamp is stored in box 1
Hier is een voorbeeldje. Op deze IndigoBlu pagina zie
je een afdruk van de vintage flourish. Onder de naam
heb ik geschreven IN BOX 1 dus deze stempel bewaar
ik in box 1
 BOX 1
BOX 1
Some of the stamp boxes. Enkele van de stempel dozen.
 Here is written IN RING BINDER 1
Hier staat er IN RING MAP 1
 So that's ring binder 1 then. Some stamp sheets
are just to big to store in a box. Dit is dus Ringmap 1. Sommige stempel vellen zijn
gewoon veel te groot om in een doosje te bewaren.
 Something else. My dies are
also kept in ring binders by brand. That is Joy! Crafts - Marianne Design - Nellie
Snellen and one binder for all other brands. Those 3 other ones are the easiest to
get around here.
Nog wat anders. Mijn mallen bewaar ik ook in ringmappen. Eén voor de Joy mallen, één
voor de Marianne Design en één voor de Nellie Snellen en nog één voor alle andere
merken. De drie eerste heb ik de meeste van vandaar.
 I stick my dies on magnet sheets. I label them with
their name. I bought picture sheets so I can keep 4 dies on 1 sheet side, every die is
in a separate pocket. So they stick and don't fly around. I cut one A4 magnet sheet
into 4 parts, so each part holds a die and fits in one photo pocket.
I heb bij de HEMA foto bladen gekocht en ik knip een A4 magneetvel in vier. Op elk
stuk hang ik een mal met een naam labeltje. Zo zitten ze mooi vast en het is super
overzichtelijk en proper.
 Told ya, they stick on the sheet ;-) LOL
Ik zei toch dat de mal mooi blijft hangen ;-) LOL

This is a drawer with all my embossing powder containers. They are big enough
so that I don't have to sprinkle my powder on a sheet of paper but above my
containers, this way you don't spill any powder. But they are not so big at the
same time just perfect size.
Dit is een lade met mijn potjes embossing poeder. Ze zijn groot genoeg zodat ik mijn
poeder op mijn image kan strooien boven mijn potje en niet boven een blad papier.
Op deze manier verspil je geen poeder dat anders toch wat op je blad blijft
kleven en weg vliegt. Maar ze zijn toch ook niet te groot, net goed.

Under my embossing powder containers another drawer with all my punches.
Daaronder een zelfde lade met mijn ponsen.

A last overall picture. Down below there on the right hand side is my printer.
Een laatste foto van een meer totaal zicht. Onderaan rechts nog een kastje
met mijn printer.
That's all folks. This is the end of the tour LOL. It is very tiny only 2 meters
by almost 3 meters long, not even a complete room. Thanks for visiting.
See you next time, love Veerle xxx
Dat was het lieve mensen. Het einde van de rondleiding. Het is echt maar
een knutselHOEKJE van zo'n 2 op bijna 3 meter niet eens een
volledige kamer. Dank je wel voor je bezoekje.
Graag tot de volgende keer, veel liefs van Veerle xxx
25 opmerkingen:
Opgeruimd staat netjes!!!
Creatieve groetjes, Gaby
Jeetje Veerle, wat is dat een heerlijke knutsel plek geworden!!!
Ik heb alleen een klein bureautje midden in onze woonkamer, hihi.
Maar wat een plek heb jij, geweldig en zo lekker opgeruimd en georganiseerd.
Leuk om te zien, bedankt voor het delen.
Lieve groetjes, Marleen
Oh my gosh veerle your craft space is just gorgeous your going to have so much fun in there :) love the pretty shelves and all your goodies enjoy your new space!!!
Hugs
Vic xx
Jeetje wat leuk om te zien, en jeetje wat heb je daar even werk aan gehad,
maar wat heb je alles efficiënt gedaan, heel duidelijk en overzichtelijk,
knap gedaan, ook van je vader toppie.
En nu: lekker aan de knutsel ☺
Gezellige en fijne nieuwe (knutsel) week
Liefssss Erica
{Heidebloempjuh}
{DT De Egel}
your craft space is gorgeous
Jeetje wat een mooi hobbyruimte heb jij zeg! En er zitten ook echt wel praktische tips tussen. Bedankt daarvoor.
Liefs,
Marieke
OMGosh Veerle! Your crafty space is so awesome!!! I love the colors you painted and I love, love, love how organized you are! I need you more than ever now. lol I can't believe the beautiful organizational pieces your dad made for you! What a wonderful and sweet dad you have Veerle, you will always have these to cherish! Ok send your dad to me. lol I need him! lol I just think your space turned out so fabulous. I have a whole room and it isn't organized at all like I want it to be and I haven't a clue where to even start. I have issues creating in it because it doesn't work for me and because it's not organized right. Yes, my friend I'm in awe of your crafty space! You have proven that you don't need a lot of space to have a beautiful crafty space. I am so loving your ceiling too! Hugs, Brenda
wat een prachtige ruimte Veerle en mooi allemaal zo opgeruimd.
je vader heeft prachtige kastjes gemaakt super.
Gr Karin
Hallo Veerle,
Ik heb met verwondering naar je nieuwe ruimte gekeken, wat is het prachtig geworden mijn compliment
en voor je vader ook.
Alles ziet er keurig en opgeruimd uit en ook zo overzichtelijk alles , je kunt weer heerlijk knutselen.
Liefs van Hetty
Well Veerle..it looks perfect as it is so organised..love the racks your Dad made you and your embossing powder draw is perfect..I do have my powders in boxes like these but they are stacked and pushed to the back so I don't use them often. Love how your stamp sets are all in folders..once again mine are hidden in drawers and boxes and have no idea what I really have..love your craft space..
luv CHRISSYxx
Oh my Veerle I'm jealous... I want everything in your craft room.... love all the racks your Dad made....How creative.... it's so organized..... Great job....
Hoi Veerle,
wow wat een klus, het ziet er prachtig uit..ik zou spontaan helemaal niks meer maken, bang om alles weer door elkaar te gaan gooien haha..complimenten voor deze super hobbykamer..
Liefs Ans
p.s. nog steeds door de griep geveld..niks aan..
Wow Veerle, what a super organised space, what a clever Dad you have. Love the velcro to attach the foam pad to the top of the DI inks...genius!! xx
Veerle wow wow wat is je hobbykamer mooi zeg ! Wat een werk maar het loont hoor en alles zo overzichtelijk ... Heel knap ook van je vader ...
Groetjes, Odette.
Oh I AM impressed! You have packed a lot of crafting into a small space and I really admire the way you've organized things. You'd go batty at my house, as I have to hunt for nearly everything as it's not at all organized. (although I do have good intentions). I love your custom made storage your Dad made for you. Especially your ink pad rack. Those kinds of storage containers purchased - are very expensive, so you are a very lucky daughter to have such a handy Dad. I liked the way you've arranged your stamps too, with the numbers- and the connections to specific boxes. I spend a lot of time hunting for a specific stamp. The mini blenders are so wonderful, and your Velcro was the correct English word. I've done that to my square ink pads, but not yet to the round ones. And the Velcro is a lot easier on removing the pads, than the 'sticky thing' that comes on the round tool. Great idea. Your craft area looks very tidy & neat, so attractive with the window letting in the natural light and the colors you've chosen to brighten your space. Well DONE! (wanna come do mine????). TFS & big Happy New Year. Hugs too. Really enjoyed seeing your tour.
Wow very impressive craft room and love the great organization.
Hugs Diane
What can I say ... Lucky you! Jx
Wonderful Veerle so beautifully organised. You are so lucky to have such a clever Dad who makes those lovely wooden storage units! Susan x
Woooooooow wat een schitterende hobbykamer en alles zo netjes en overzichtelijk, daar kun je niet anders als alleen maar schitterende kaarten maken en ook nog genieten en naar buiten kijken, fijn dat je zo'n handige papa hebt, liefs van Lydiaxxx
WOW you are such a lucky and very well organised lady Veerle, your new craft room looks amazing.
hugs
lorraine x
WOW Veerle! Your crafting space is gorgeous and so organised. I especially love your shelving for the inkpads and also those lovely green and pink containers for the paint dabblers. I've been putting all my Nestabilites in a folder with magnetic sheets, labelled like you. I've been trying to think of a way of storing all the single dies and love your idea of A4 sheets cut into four and put in separate pockets. I'll have to look around for some A4 plastic pockets, split into quarters. xx
Hoi Veerle,
Prachtige kamer zo. En alles zo netjes georganiseerd. Hadden we allemaal maar zo'n handyman in de buurt.
Heerlijk dat je zo naar buiten kunt kijken. Bedankt ook voor de leuke tips.
Groetjes, Sylvia.
Groetjes,Sylvia.
Amazing! Thanks for the tips on the distress ink blender pads! I will need to do that! :)
Hoi Veerle,
Wat een efficiënt, mooi kamertje heb je, toppie.
Lieve groetjes, Tonny
Thank you for the tour. i love your redone room...it is wonderful. I will come back and look at this in even more detail after i have moved. I am always looking for good organizational ideas!
Een reactie posten