
Hallo allemaal,
Ik had jullie beloofd om te vertellen hoe je veel meer uit je bordje scheerschuim kan halen. Dat ga ik nu doen en nadien krijgen jullie een hoop voorbeeldkaartjes gemaakt met deze techniek.
Hi everyone,
I had promised you I would tell you how you can do a lot more with just one plate shaving foam. I will tell you now and afterwards I will show you quit some cards made with this technique.

Nadat je je print hebt genomen kun je aan de randen nog een afdrukje maken met wat rest karton maar voor de rest kun je niet veel meer doen met je bordje scheerschuim omdat je het patroon niet meer zal krijgen. Ga dan je scheerschuim mengen zodat je kleuren volledig onder je scheerschuim zitten en je geen wit schuim meer hebt. Smeer dit dan uit over een stencil. Maw leg een stencil naar keuze op je karton en smeer die vol met de gemengde scheerschuim. Een dikke laag erop. Héél voorzichtig de schuim verwijderen en even een tissue erop leggen om de laatste schuim op te zuigen. Stencil weg en de stencil is afgedrukt op je karton. Met dat ene bordje scheerschuim kun je nu nog honderden afdrukjes maken. Zelfs als je slechts 1 druppeltje extra inkt toevoegd en het er grof onder mengt heb je doorheen je stencil weer een heel ander en speciaal effect.
After you made your original print, you can make a few extra prints at the borders of your plate with little pieces of cardstock. But that's all you can do. The foam isn't good enough anymore to make more prints with. Then mix your foam with the colour in it so that there is no white foam left. Take your cardstock, lay a stencil/mask on it and put a thick layer of coloured shaving foam on your stencil. Leave it there a few seconds. Remove the foam very carefully, lay a tissue on top of it to suck up all the left over foam from your stencil. Remove the stencil and voila you have the stencil printed on your cardstock. With that one plate of shaving foam you can make hundreds more prints. And if you add only 1 drop of ink and miw it in very roughly and then use it through your stencil you will again have a different and very special effect.
Hier zijn de voorbeeldjes/ Here are the samples.
Hier bij N°1 heb ik in het midden een kleine mask van creaLies gebruikt en gezorgd dat ik binnen de cirkel bleef zodat rondom rond alles wit bleef om daar dan blauwe inkt te kunnen sponzen. Vliegtuis is van Nellie's Choice, tekst van ViVa en rode cirkels van creaLies.
Here with N°1 I used a mini mask from CreaLies and I watched out to stay inside the cirkel with my foam because I wanted everything outside the cirkel to stay white to be able to sponge it blue. Airplane is Nellie's Choice, text ViVa and red circles Bits & Pieces stamp from CreaLies.

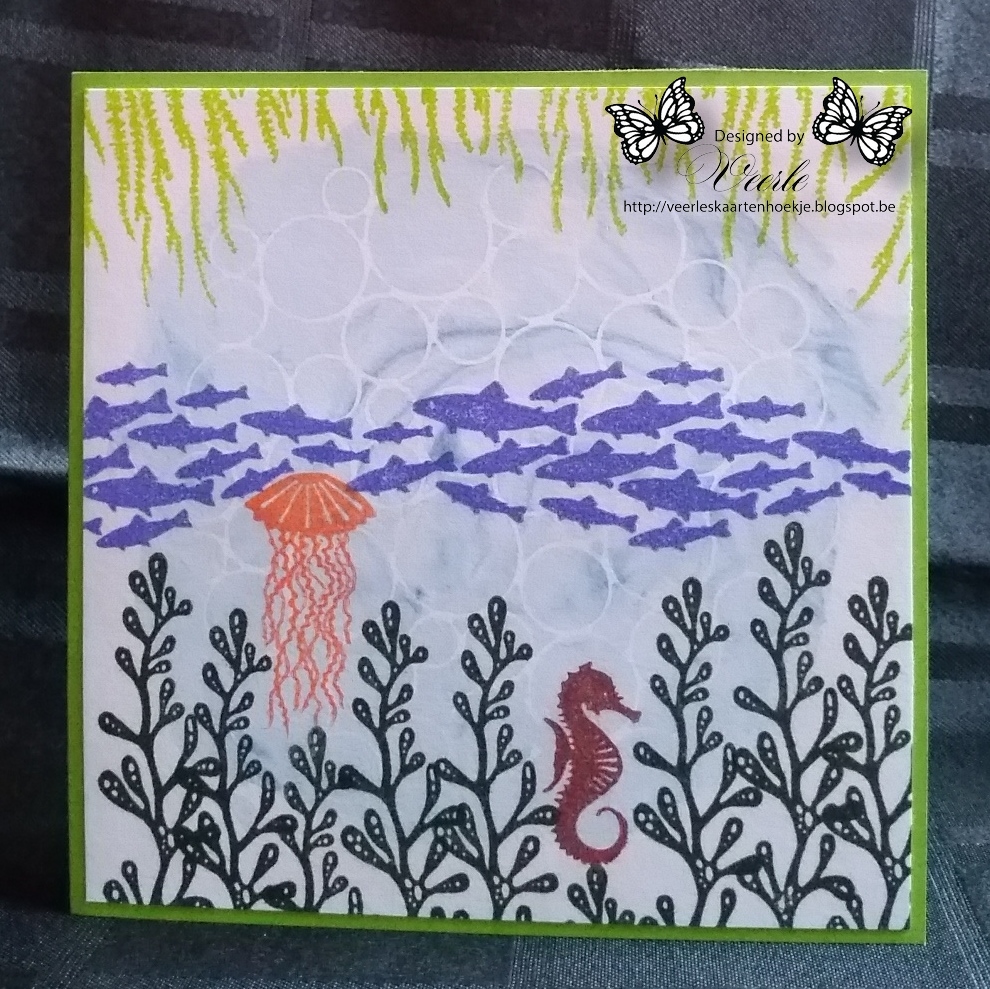
Bij N°2 heb ik ook een mini mask van creaLies gebruikt met cirkels maar deze keer er niet op gelet dat ik binnen de cirkel bleef. Daarna een water scene gestempeld allemaal met Lavinia stempels.
Here with N°2 I again used a mini mask from creaLies 'circles' but this time I didn't tried to stay within the borders of the mask. Then I stamped an under water scene all with Lavinia stamps.
Voor N°3 alweer een mini mask van creaLies en ditmaal heb ik het mask in de linker boven hoek gelegd en als dat deel bewerkt was nog een klein stukje gedaan met hetzelfde mask in de rechter onder hoek. tekstje is van Lawn Fawn en de auto Nellie's Choice. De auto nog ingekleurd met Faber Castell Polychromos potloden.
For N°3 again a mini mask from CreaLies and this time I layed down my mask in the top left corner and when my print there was finished I layed it in the bottom right corner to make an additional small print there. Sentiment is from Lawn Fawn and the race car from Nellie's Choice. I coloured in the car with Faber Castell Polychromos pencils.

N°4 een CraftEmotions stencils 'Botanical Leaves' om af te werken; aan de linker zijde heb ik een uitsnede gemaakt met een CreaLies Decorette XL de vlinders zijn malletjes van CreaLies. De gestempelde flock vlinders is van Precious Marieke en de tekst van Leane design. Om te accentueren heb ik met een blauwe Wink of Stella brush aan 1 zijde lijntjes getrokken.
N°4 I used a CraftEmotions stencil 'Botanical Leaves' to finish the card: left side I made a die cut with a CreaLies Decorette XL die. The butterflies are also CreaLies dies. The stamped flock of butterflies are Precious Marieke, the sentiment Leane Design. To give the leaves accents to stand out more I drew lines at one side of the leaves with a blue Wink of Stella brush.

N°5 Hier heb ik een Dutch Doobadoo stencil gebruikt. De stempeltjes zijn allemaal van Couture Creations.
N°5 Here I used a Dutch Doobadoo stencil and the stamps are all Couture Creations.

Alle gebruikte materialen zijn te verkrijgen in de webwinkel. Dat zijn ze. Ik hoop dat ik jullie heb kunnen inspireren en dat je deze gevorderde versie ook eens uit probeert. Heel veel plezier ermee. Zoals beloofd morgen versie nummer 3 van de scheerschuim techniek. Hartelijk bedankt om langs te komen en een berichtje achter te laten. Graag tot morgen, groetjes Veerle x
All the materials used are available in my webshop. That's it for today. I hope I could inspire you with these cards and I hope you give this extended version a go. I wish you a lot of fun with it. As promised tomorrow version 3 of the shaving foam technique. Thank you so much for stopping by and for leaving me a comment. Love to see you back tomorrow. Hugs Veerle x
14 opmerkingen:
Wauw.....ik vind het resultaat supergaaf Veerle!
Misschien ga ik het ook eens uitproberen!
Groetjes en bedankt voor de uitleg,
Diny
wow love this tec. I tried it long time ago. I do love your botanical leaves stencil and that card, what a great card. the one with underwater theme is awsome to..all cards are great ;O))
Veerle, wat een bijzondere kaarten heb je gemaakt. Prachtig! Dank je wel voor de uitgebreide uitleg en ik ga dit zeker proberen!
Lia xx
Zooooo wat creatief dit! Heel leuk om te lezen hoe dit tot stand is gekomen Veerle! En iedere achtergrond is weer anders...knap gedaan!
Groetjes van Gerie
Hi Veerle! Have been missing in action due to a virus I picked up from I know not where! Spent the last few days in bed but feeling a lot better now! These cards are fabulous! Have never tried this technique but it looks wonderful! Love them all!! hugs x
stuk voor stuk leuke kaarten,Veerle.Vooral de onderwater kaart is superleuk.Fijne dag.
Groetjes,Sylvia.
You are so clever and loving your post using this shaving foam. The results always look fabulous and I do intend trying it out...xx [aNNie]
What fabulous samples you have created Veerle. The designs are wonderful. Hugs Jennifer xx
Weer zo'n mooie reeks! De laatste 3 vind ik super; zou geen favoriet kunnen kiezen... Groetjes, Gerrina
Gosh Veerle the effect is amazing. Better get me some shaving foam!! xx
Fabulous cards Veerle! You use some great techniques and stamps! Thank you for visiting my blog today! Have a great week my friend! Luv & Hugs. Hazel xx
My Card Attic
Gorgeous cards, Veerle, very effective techniques. Thanks for the instructions. xx
those cards are so nice!
Well, I can see my legs will have to take a back seat as I have shaving foam crafty stuff to do..FABulous projects Veerle..brilliant.
luv CHRISSYxx
Een reactie posten